
Once you’ve got a web application running locally on your machine, if you want to access it on the internet, you’ve got to deploy it. And instead of just deploying it manually on a virtual machine in the cloud, let’s dockerize the app and then deploy it to the cloud. If you’re not familiar with Docker, follow this excellent tutorial first.
In this guide, I’ll walk you through the steps on how to dockerize a Node.js application and then deploy it to Amazon Web Services (AWS) using Amazon Elastic Container Registry (ECR) and Amazon Elastic Container Service (ECS). We’ll do all this in just 12 steps! OK, just kidding, it’s way more than 12 steps, but hang in there and follow along.
1) Environment Setup
To deploy your Node.js app to AWS using Docker, you’ll need the following:
-
Node and NPM installed on your local machine.
-
Docker installed on your local machine (including Docker Engine and Docker CLI Client). To check if the installation worked, run this command in the terminal.
$ docker --version
If you get a version number, you’re good to go. If not, Docker did not get installed properly. Do not proceed until Docker is properly installed - use your google foo to debug it!
-
AWS Account: Sign up for a free tier.
-
AWS CLI: Install the command line interface for AWS. You’ll need Python installed on your local machine before you install AWS CLI. If you’re on a mac and after installing AWS you’re not able to get a positive response from:
$ aws --version
…you might have to change your path. Fire this in your terminal (based on your python version):
$ export PATH=~/Library/Python/2.7/bin/:$PATH
And then add this above line to your bash_profile:
$ sudo nano ~/.bash_profile
2) Overview of Docker and AWS
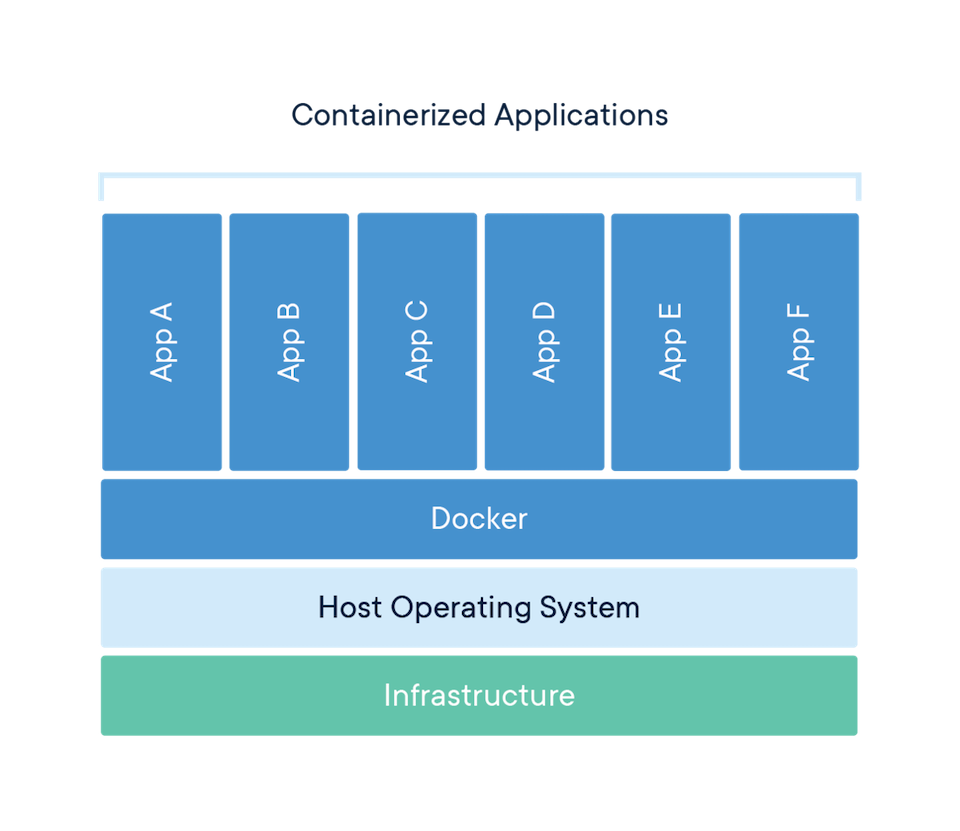
Docker is open source software that allows you to pack an application together with its required dependencies and environment variables in a container that you can ship and run anywhere. It is independent of platforms or hardware, and therefore the containerized application can run in any environment in an isolated fashion.
Docker containers solve many issues, such as when an app works on a coworker’s computer but doesn’t run on yours, or it works in the local development environment but doesn’t work when you deploy it to a server.
Amazon Web Services (AWS) offers a reliable, scalable, and inexpensive cloud computing service. As I mentioned before, this tutorial will focus on using the ECR and ECS services of AWS. So many acronyms, I know.
3) The Node.js app to deploy
If you have a node app that you’d like to deploy, skip to Step 4. If not, let’s quickly build a very simple node app that we’ll use for the purpose of this tutorial. Once you get the hang of Docker and AWS, it’ll be a synch to deploy any node app to AWS with Docker.
Enter the following in your terminal (obviously not with the comments!):
// create a new directory
$ mkdir sample-app
// change to new directory
$ cd sample-app
// Initialize npm
$ npm init -y
// install express
$ npm install express --save
// create a server.js file and open it
$ touch server.js
$ open server.js
Open server.js in your IDE like VSCode and create this simple app:
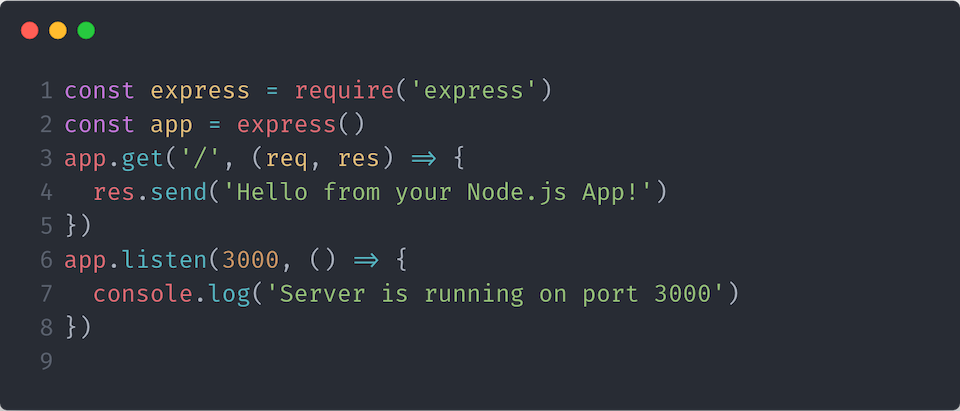
Then run your app with this command in the terminal:
$ node server.js
Now point your browser to http://localhost:3000 and you should get a “Hello from your Node.js App!”
Next, we’re going to dockerize our app.
4) Writing a Dockerfile
We are going to start dockerizing the app by creating a single file called a Dockerfile in the base (root) of our project directory. This file has no file extension. You can either create this file in your terminal with the touch command or in your IDE.
$ touch Dockerfile
The Dockerfile is the blueprint or recipe from which our images are built. And then images turn into containers, in which our apps get run.
Every Dockerfile starts with a base image at its foundation. There are two ways to create your Dockerfile:
-
Use a plain OS base image (for example Ubuntu) and install an application environment in it such as Node.js or
-
Use an environment-ready base image to get an OS image with an application environment already installed.
We will proceed with the second approach. Let’s use the official Node.js image hosted on Docker Hub which is based on Alpine Linux (because Alpine is much smaller than most distribution base images).
Open your Dockerfile and type these commands in (change the port at EXPOSE to match what’s in your server file if it’s not 3000 and then adjust the last line to the path of your server.js file in relation to your project root folder):
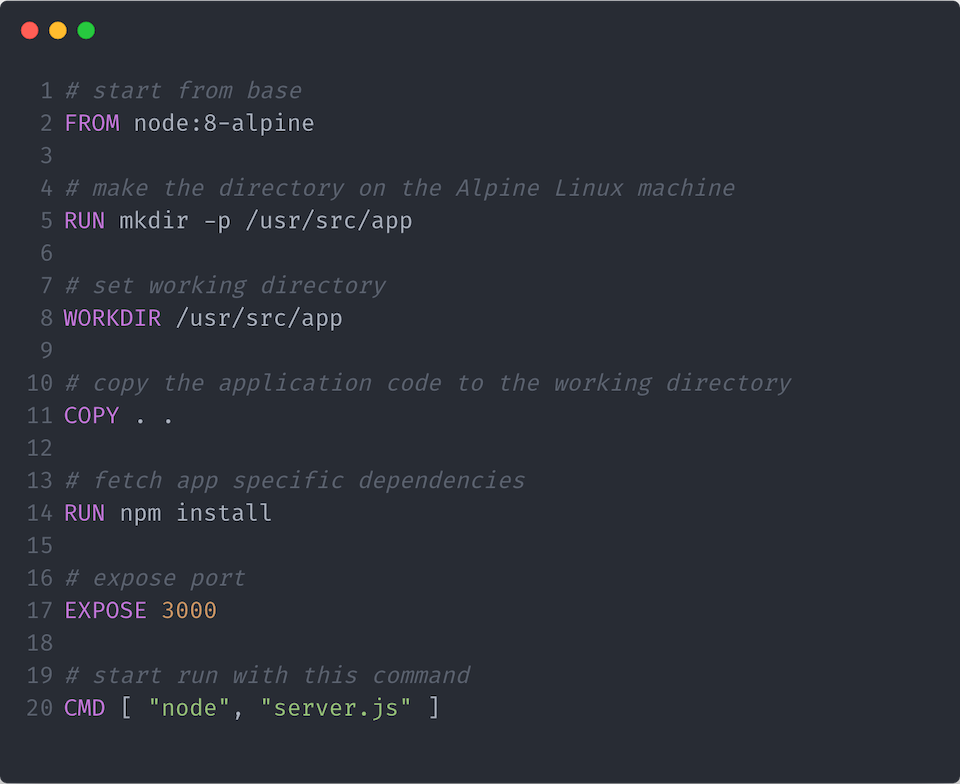
Let’s walk through this line by line to see what is happening here, and why.
# start from base
FROM node:8-alpine
- Always start a Dockerfile with a FROM expression. This is where we specify our base image. We are building our Docker image from the official Node.js image from Docker Hub (a repository for docker images).
# make the directory on the Alpine Linux machine
RUN mkdir -p /usr/src/app
- The RUN expression allows us to execute a command for anything we want to do. Here we are creating a subdirectory /usr/src/app that will hold our application code within the docker image.
# set working directory
WORKDIR /usr/src/app
- The WORKDIR expression establishes the subdirectory that we created as the working directory for any RUN, CMD, ENTRYPOINT, COPY and ADD instructions that follow it in the Dockerfile. We are setting /usr/src/app as our working directory.
# copy the application code to the working directory
COPY . .
- The COPY expression lets us copy files from a source to a destination. We copied the contents of our node application code (server.js and package.json) from our current directory to the working directory in our docker image.
# fetch app specific dependencies
RUN npm install
- Next we RUN npm install to fetch our app specific dependencies
# expose port
EXPOSE 3000
- The EXPOSE expression informs Docker that the container listens on the specified network ports at runtime. We specified port 3000.
# start run with this command
CMD [ "node", "server.js" ]
- Lastly, the CMD expression specifies the command to start our application. This tells Docker how to run your application. Here we use node server.js which is typically how files are run in Node.js (don’t use commands such as nodemon or any scripts that involve webpack or babel, just plain old node and the location of your server).
With this completed Dockerfile, we are now ready to build a new Docker image.
5. Building a Docker image
Make sure that you have Docker up and running. Now that we have defined our Dockerfile, let’s build the image with a title using -t and don’t forget the dot at the end:
$ docker build -t sample-app .
This will output hashes and alphanumeric strings that identify containers and images saying successfully built and tagged on the last line:
$ docker build -t sample-app .
Sending build context to Docker daemon  1.963MB
Step 1/7 : FROM node:8-alpine
 ---> ee8b4f3c67fa
Step 2/7 : RUN mkdir -p /usr/src/app
 ---> Running in 7ceb1d0478b3
Removing intermediate container 7ceb1d0478b3
 ---> d0ea3510607f
Step 3/7 : WORKDIR /usr/src/app
 ---> Running in 94a2e4ca871f
Removing intermediate container 94a2e4ca871f
 ---> 906590ca0f0c
Step 4/7 : COPY . .
 ---> 0b43f4822b8e
Step 5/7 : RUN npm install
 ---> Running in 8dcb9f9245c3
npm notice created a lockfile as package-lock.json. You should commit this file.
npm WARN [email protected] No description
npm WARN [email protected] No repository field.

audited 121 packages in 0.986s
found 0 vulnerabilities

Removing intermediate container 8dcb9f9245c3
 ---> 6e518f77f973
Step 6/7 : EXPOSE 3000
 ---> Running in 92e41fa6a5cc
Removing intermediate container 92e41fa6a5cc
 ---> d03d8542c7ea
Step 7/7 : CMD [ "node", "server.js" ]
 ---> Running in 88aa66943826
Removing intermediate container 88aa66943826
 ---> 238f709e2388
Successfully built 238f709e2388
Successfully tagged sample-app:latest
$
6. Running a Docker Container
Great job, we’ve built the docker image. To see all your created images, run:
$ docker images
You should see the image we just created as the most recent based on time:

Copy the image ID. Then, to spin-up the container, run this command (replacing image-id with your actual image ID:
$ docker run -p 80:3000 <image-id>
By default, Docker containers can make connections to the outside world, but the outside world cannot connect to containers. -p publishes all exposed ports to the host interfaces. Here we publish the app to port 80:3000. Because we are running Docker locally, go to your browser and you should see your app running in your container at http://localhost:80 which is the same as going to http://localhost (without entering in port 80).
At any moment, you can check running Docker containers by running this command from another terminal tab (since your server is running in your initial terminal tab):
$ docker ps
From this terminal tab, stop the container from running with:
$ docker stop <container-id>
Leave the Docker daemon running. It’s time to configure AWS.
7. Create the registry and push your app image there
Amazon Elastic Container Registry (ECR) is a fully-managed Docker container registry that makes it easy for developers to store, manage, and deploy Docker container images. Amazon ECR is integrated with Amazon Elastic Container Service (ECS), simplifying your development to production workflow.
The keyword “Elastic” means you can scale the capacity or reduce it as desired.
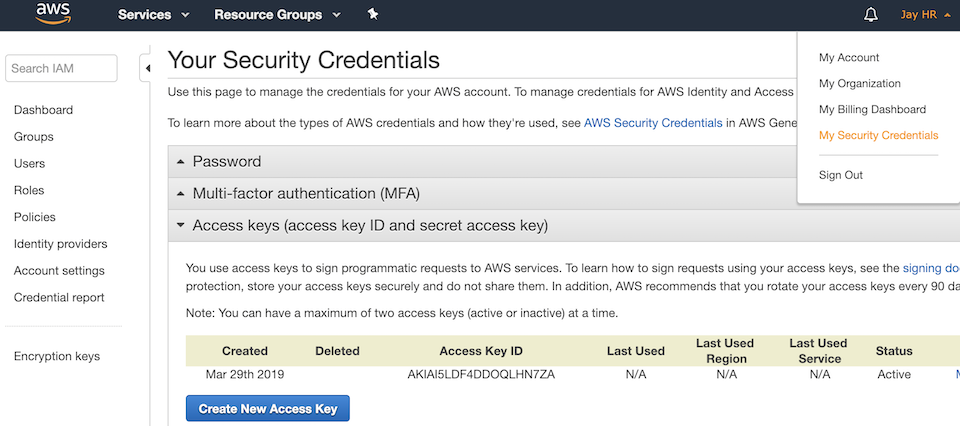
Before we get to pushing up our app image, ensure that your AWS CLI can connect to your AWS account. To do that, you’ll need your AWS Access Key ID and Secret Access Key. If you didn’t save them when they were created, you’ll have to create a new set of keys. To get a new set of keys, go to your AWS Console, then under your username, go to My Security Credentials, then expand the Access keys bar, click on Create New Access Key and save them in a safe place:
Then from your terminal, run:
$ aws configure
If your AWS CLI was properly installed, aws configure will ask for the following:
$ aws configure
AWS Access Key ID [None]: <accesskey>
AWS Secret Access Key [None]: <secretkey>
Default region name [None]: us-east-2
Default output format [None]:
Enter your Access Key ID, your Secret Access Key and the Default region name of your account (for example us-east-1 for the Northern Virginia datacenter or us-east-2 for the Ohio datacenter) and just enter (skip) at the Default output format.
Confirm that your AWS CLI is properly configured by once again running the aws configure command and pressing enter at each prompt to accept what’s already there:
$ aws configure
AWS Access Key ID [****************RVHV]:
AWS Secret Access Key [****************4bCd]:
Default region name [us-east-2]:
Default output format [None]:
Steps to create the registry for your images:
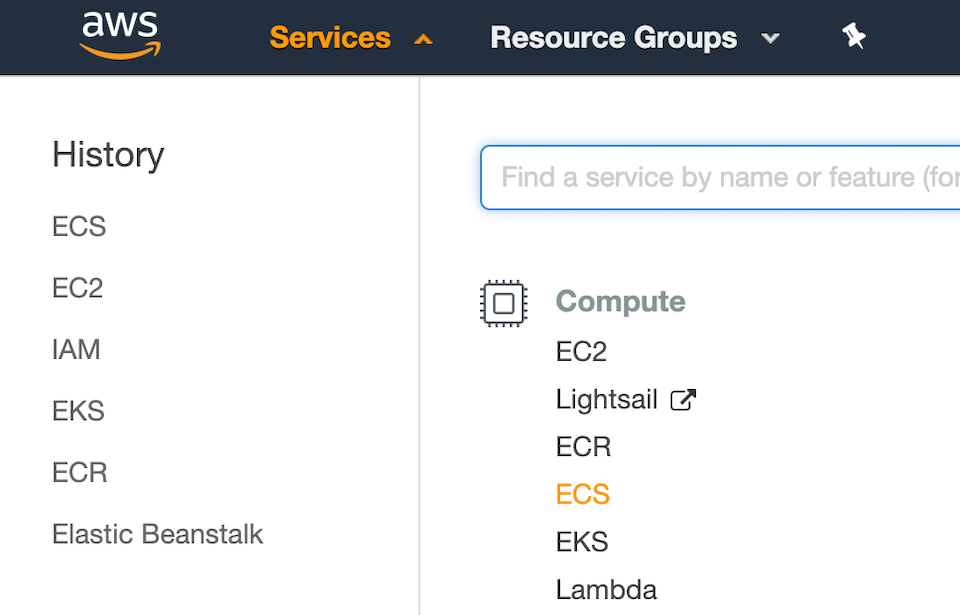
- Go to the AWS console and sign in.
- Under the Services dropdown menu, under Compute, select ECS:
-
Scroll to the bottom of the first run page and click cancel, then enter the ECS dashboard.
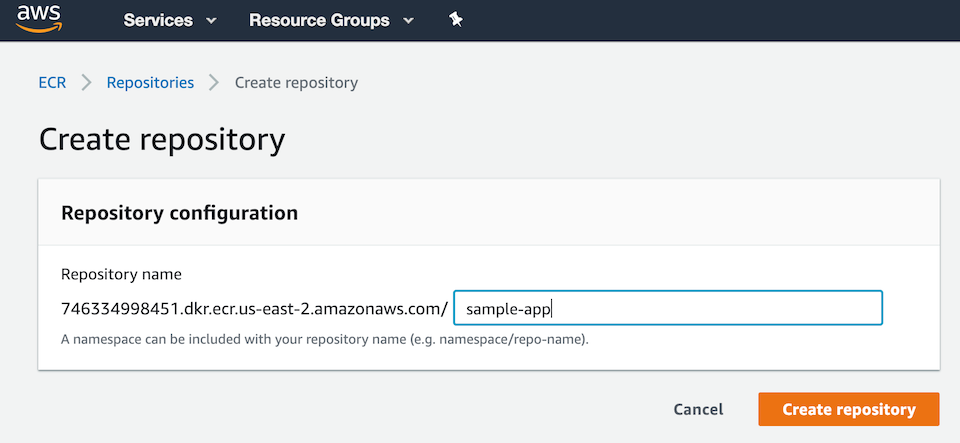
-
On the left menu, under Amazon ECR, go to Repositories then click Create Repository. Enter a name (preferably with the same container name as in your local dev environment for consistency), for example, use sample-app.
Then click on View Push Commands on the upper right and follow the 5 instructions from the AWS console for building, tagging, and pushing your Docker image:

Note: The arguments of the following are particular to my registry and will differ from yours, so just follow the steps outlined on your console.
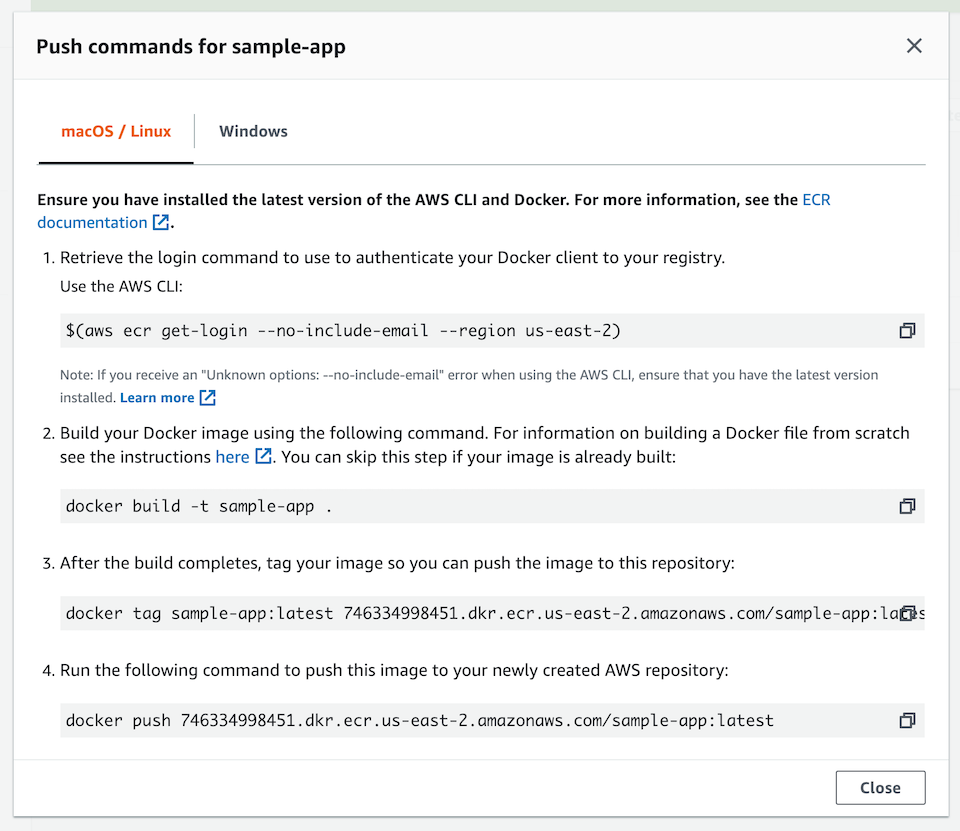
Explanation of the push commands:
- Retrieve the login command that you can use to authenticate your Docker client to your registry (copy and paste into your terminal following your push commands):
$ aws ecr get-login --no-include-email --region us-east-2
Note: If you receive an “Unknown options: - no-include-email” error, install the latest version of the AWS CLI. Learn more here.
Note: If you are using Windows PowerShell, run the following command instead:
$ Invoke-Expression -Command (aws ecr get-login --no-include-email --region us-east-2)
If successful, you should get an output of Login Succeeded.
- Build your Docker image using the following command. For information on building a Dockerfile from scratch, see the instructions here. You can skip this step since our image is already built:
$ docker build -t sample-app .
- With a completed build, tag your image with a keyword (for example, latest) so you can push the image to this repository (again, use your push commands):
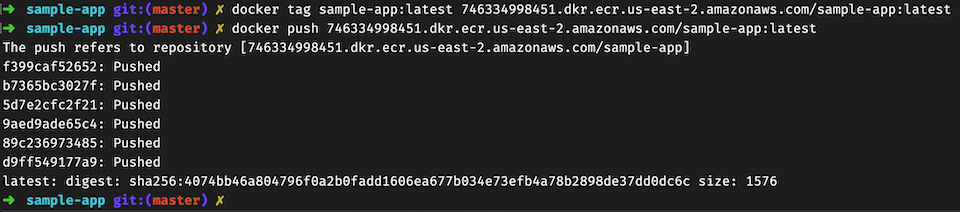
$ docker tag sample-app:latest 746334998451.dkr.ecr.us-east-2.amazonaws.com/sample-app:latest
- Run the following command to push this image to your newly created AWS repository:
$ docker push 746334998451.dkr.ecr.us-east-2.amazonaws.com/sample-app:latest
This is what my terminal looks like after I ran the push command:
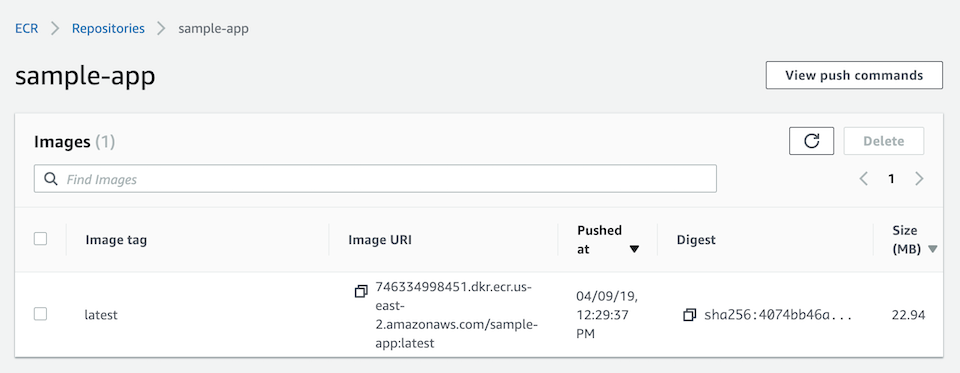
Now go to your Amazon ECR and click on your repository name and you should see your Docker image there. Copy the Image URI and keep it handy, we’ll need to paste it in the next step:
Next we’ll create the Task, Service, and Cluster to run this Docker image on an EC2 instance. This part can be tricky, so follow along closely.
8. Create the Task Definition
Tasks on AWS function just like the docker run command on the Docker CLI. They define:
- Container images (to use)
- Volumes (if any)
- Networks Environment Variables
- Port mappings
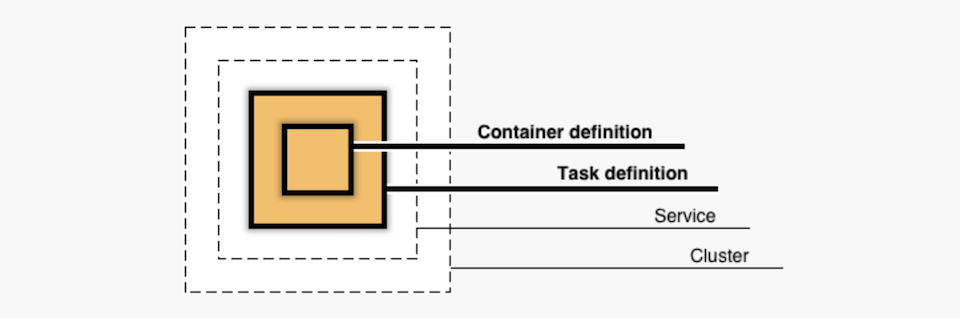
Here’s an overview of how Amazon ECS structures the container, task, service and cluster (we’re going to go from the inside out):
Steps to create a new Task Definition:
- From Task Definitions in the ECS dashboard (on the left), click on the Create new Task Definition button.
- Select EC2 as the launch type.
- Give your task a name (for example: sample-app-task), then skip the next few fields and scroll down to and click on Add container.
- Give the container a name, keep it straight-forward (for example: sample-app-container).
- Past your Image URI.
- Set Memory Limits to Soft Limit: 512 (no hard limits)
- Map your ports (for example, 80: 3000), leave protocol as TCP
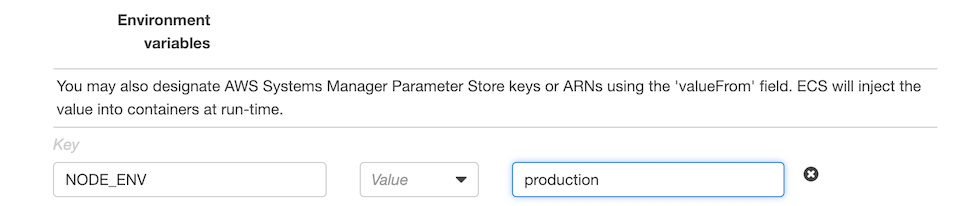
- Scroll down to Environment Variables and set “NODE_ENV” as the key and “production” as the value.
- Skip everything else, scroll to the bottom and click Add.
- Back in your Create Task Definition window, you should see your container loaded with your image, then scroll down and click Create.

9. Create an IAM role for your cluster
Before you create your cluster, you’ll have to define an AWS Identity and Access Management (IAM) role. Here’s a little primer from AWS:
What are IAM roles?
IAM roles are a secure way to grant permissions to entities that you trust. Examples of entities include the following:
- Application code running on an EC2 instance that needs to perform actions on AWS resources
- An AWS service that needs to act on resources in your account to provide its features
So for AWS Elastic Container Service to be able to spin up an EC2 instance and run your Docker container, it needs explicit permissions. Let’s create an IAM Role to enable that.
Steps to Create an IAM Role:
- Under the Services dropdown menu on the main header, you’ll find IAM on the right under Security, Identity & Compliance, or you can click here.
- From the IAM menu on the left, click on Roles, then Create Role.
- Select AWS Service as the type of trusted entity.
- Select EC2 as the service that will use this role, then scroll and click Next.
- On the Permissions page, search for “EC2 container” policies and select “AmazonEC2ContainerServiceforEC2Role”, then click Next, skip tags.
- On the last page (4), give the role a name (for example: ECStoEC2role), then Create Role. You should see your new role on the Roles page in your IAM.

Now let’s use this role when we create our cluster.
10. Create a Cluster
A cluster is where AWS containers are run. They use configurations similar to EC2 instances.
Steps to Create a Cluster:

- From the Services dropdown, select ECS to go back to your ECS dashboard.
- From the left menu, under Amazon ECS (not EKS), click on Clusters, then Create Cluster
- Select EC2 Linux + Networking as the cluster template.
- Name your cluster (for example: sample-app-cluster).
- Leave it as an On-Demand Instance and select t2.micro under the EC2 Instance Type dropdown (feel free to select a larger instance type if your situation needs it).
- Set number of instances to 1, and EBS Storage to 22.
- You can leave the Key pair as none or select a keypair if you want to have the ability to SSH into your instance (most likely you won’t need to).
- Under Networking, set VPC as Create a new VPC, then scroll down.
- Under Container instance IAM role, select the role we just created (for example: ECStoEC2role), then click Create.

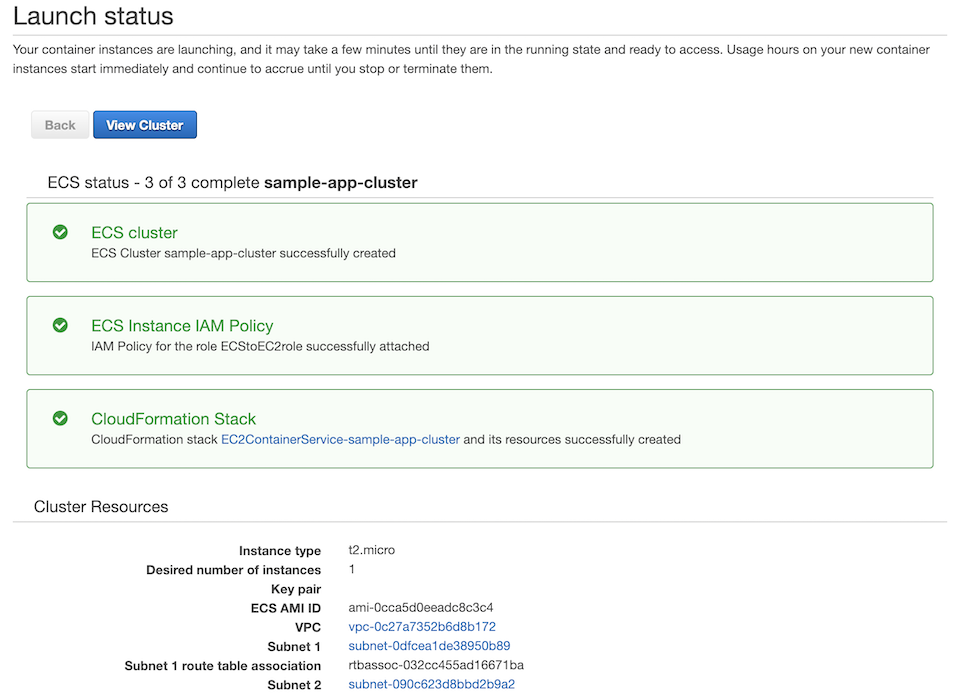
It’ll take a few minutes for the Cloud Formation Stack to finish processing. Once processed, you should be able to click on View Cluster and see the status set to Active.
11. Create a Service to run the Cluster
Now let’s create a service to run this cluster.
Steps to create a Service:
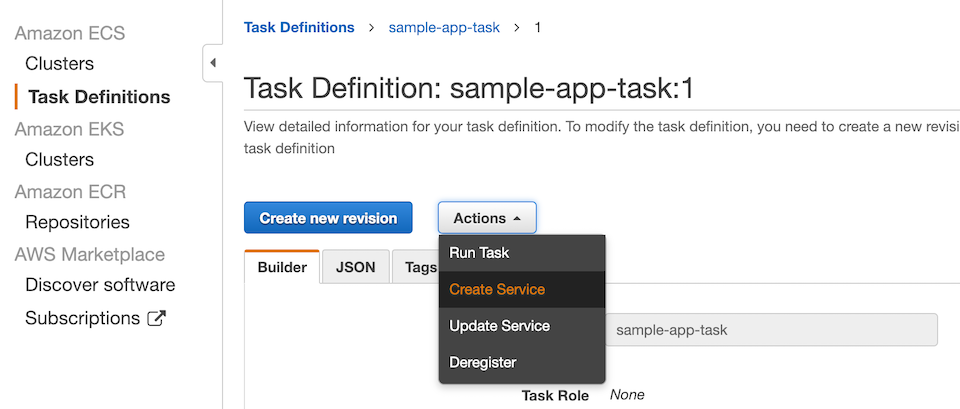
- From the ECS left menu, click on Task Definition, then select your task (for example: sample-app-task).
- Click on the latest revision.
- From the Actions drop down (next to Create new revision), select Create Service.
- On the Configure Service page, select EC2 as the Launch type.
- Set Cluster to the name of our cluster (for example: sample-app-cluster)
- Name your service (for example: sample-app-service)
- Set Number of Tasks to 1.
- Skip through all the other fields and pages and on page 4, scroll down and click on Create Service.
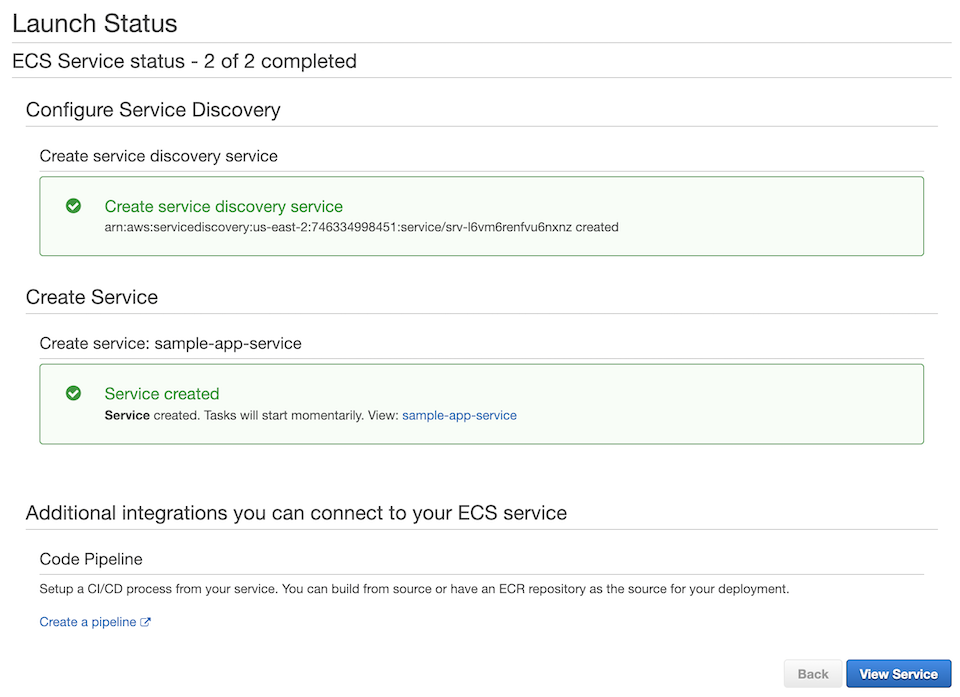
- On the Launch Status page, you should see green checks for Create service discovery service and Service created. Click on View Service. If the status in the Tasks tab is pending, give it a few minutes and then it will be Running (click on the refresh icon on the right).
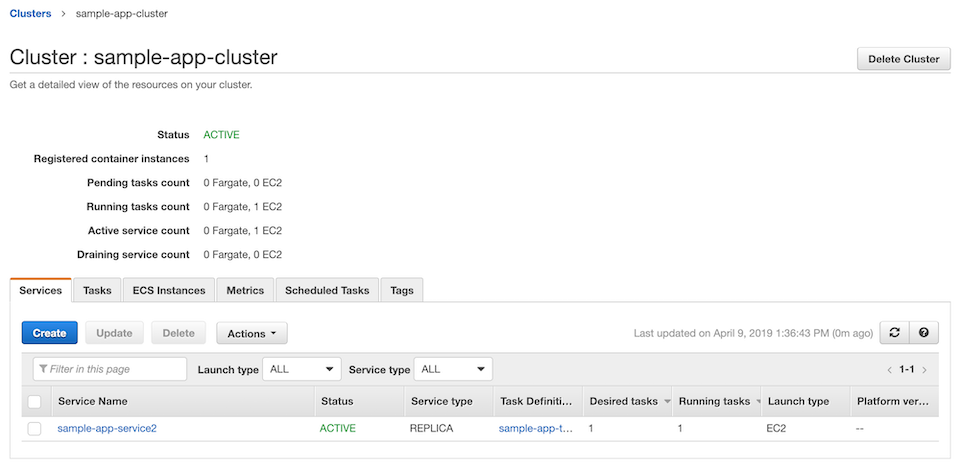
Once Active, click on the Cluster name (for example: sample-app-cluster) to go back to our Cluster page.
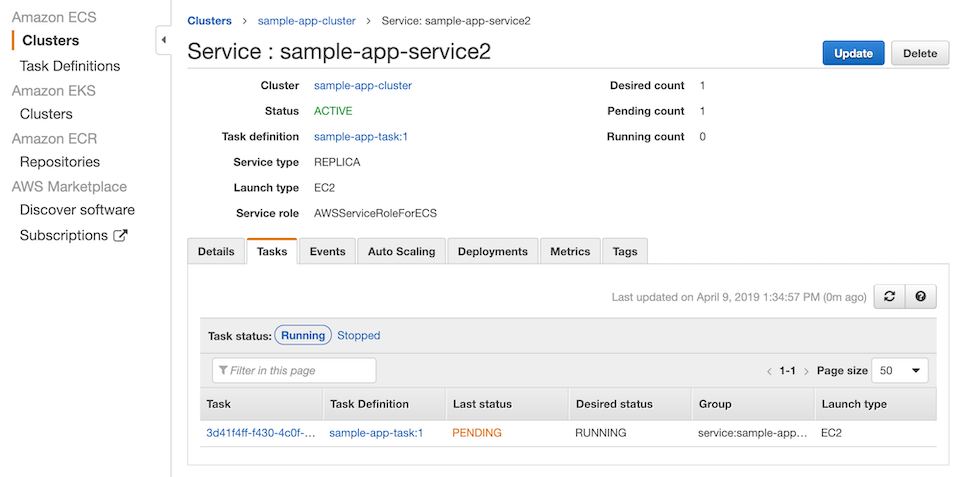
Steps to verify that container is launched and running:
- On the Cluster page, in the Services tab, you should see your service name set to Active, then the assigned Task Definition with Desired Tasks and Running Tasks set to 1 and Launch Type set to EC2.
-
On the Tasks tab, you should see our named Task Definition set to Running and Launch type set to EC2.
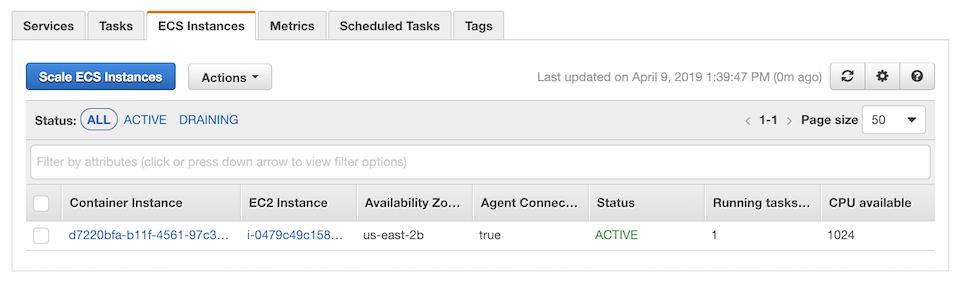
-
Click on the ECS Instances tab then click on the container and in the Container Instance details page, get the Public DNS (or Public IP) to see your dockerized app live on the internet!

12. The End!
Woo hoo! Congrats on finishing this marathon tutorial! You now know how to Dockerize a Node.js app and deploy it on AWS. That is no small feat. You can feel proud of your DevOps chops. Now go and deploy a real app.
Grab the code for the Docker part from Github.
If you run into any problems with these instructions or notice any typos, please drop me a line here.